
AI animation tools make it possible to transform a single image into a dynamic scene. Learning how to edit AI animation clips into a video is what turns those short generated moments into a polished animation with pacing, transitions, and storytelling.
(Click to enlarge images above on smaller devices)
However, most AI animation tools generate clips that last only a few seconds. On their own, these short segments can feel incomplete. Learning how to edit AI animation clips allows creators to combine these pieces into a cohesive sequence that feels polished and intentional. Editing gives you control over pacing, transitions, visual effects, and sound, helping transform a series of short clips into a cinematic and engaging animation.
If you are new to this workflow, it can help to first understand how to animate AI images before moving into the editing stage. The process is often simpler than it seems. With the right prompt, tools like Kling AI, Hailou AI, or VideoExpress can turn a still image into a short animated clip in just a few steps. That animated clip becomes the starting point for the editing techniques covered in this guide. If you would like to learn more about how this process works, you can explore our guide on how to animate AI images or learn how strong picture prompts help shape the final animation.
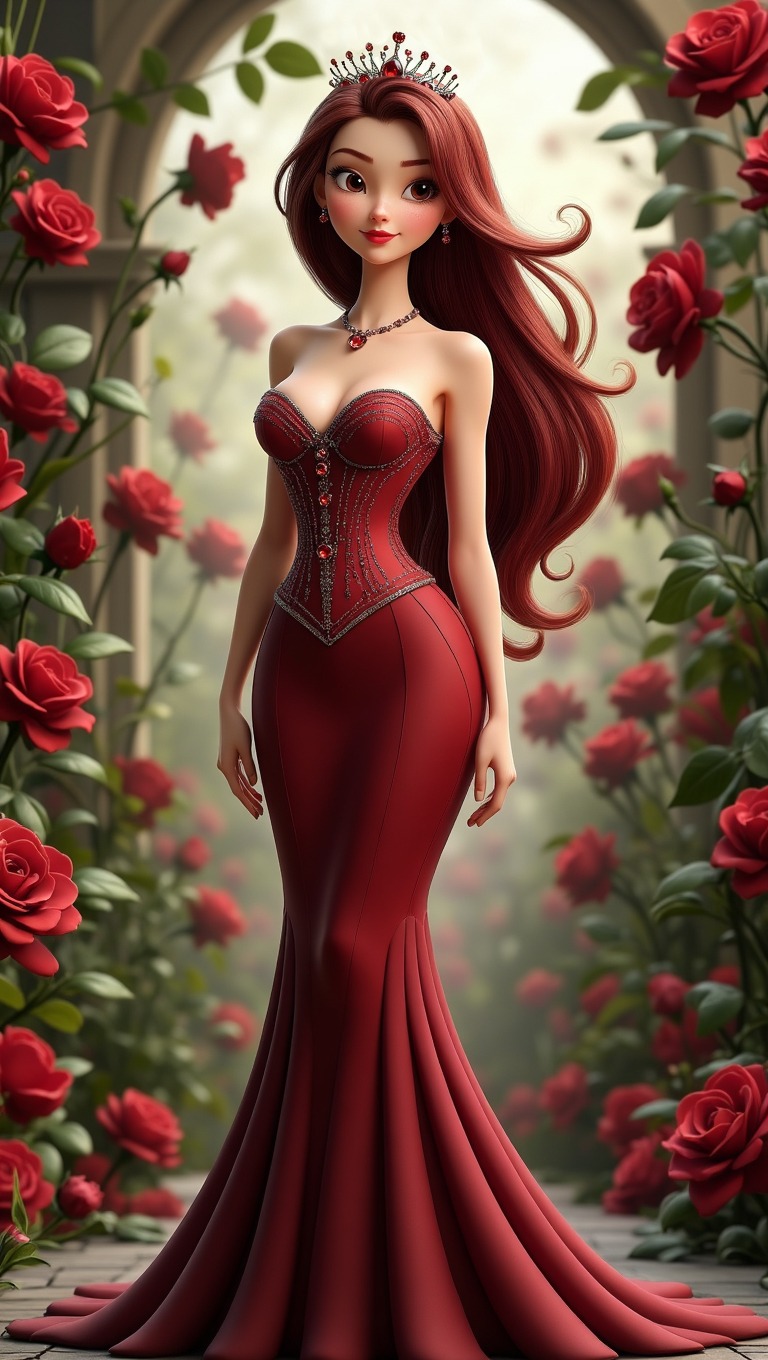
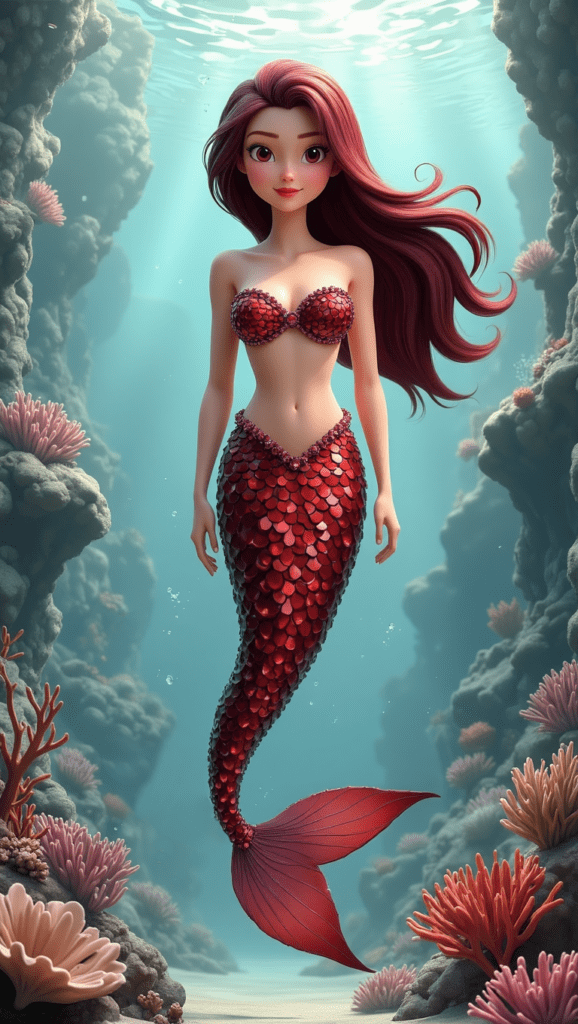
In this tutorial, we will walk through a simple workflow that demonstrates how to edit AI animation clips into a video in CapCut. The example uses a short fantasy animation where a mermaid rises from the ocean and transforms into a queen, illustrating how editing can shape a short AI clip into a small visual story.
This guide shows how to edit AI animation clips in CapCut so short AI generated segments can be combined into smooth cinematic scenes.
Full Disclosure:
Parts of this blog post were written with the help of AI, but it was also refined with my own experience, personal voice, and hands-on testing. I also checked the content for plagiarism to make sure the explanations and structure were fully my own.
What You’ll Learn in This Guide
In this tutorial, you’ll learn how to:
- Import AI animation clips into CapCut
- Use a base image to create smoother animation starts
- Structure clips to build a short visual story
- Add transitions and visual effects carefully
- Sync animation timing with music for cinematic impact
Why Learning How to Edit AI Animation Clips Matters
AI animation generators are excellent at producing motion, but they rarely produce a finished video on their own.
Raw animation clips often have a few common problems:
- Clips begin or end abruptly
- Pacing feels rushed
- Scenes feel disconnected
- There is no music or atmosphere
Instead of presenting a single AI generated clip, editing allows you to combine several moments into a cohesive visual sequence.
Building a Short Story with AI Animation
The animation used in this example follows a simple transformation story.
Rather than creating a long scene, the goal was to build a short cinematic moment designed for Shorts-style video (9:16).
The sequence unfolds like this:
- A mermaid appears underwater
- She swims toward the surface
- Magical petals begin to appear
- She transforms and rises as a queen
Even though the animation lasts only a few seconds, the pacing and music make the scene feel intentional and dramatic.
Short-form animations work especially well when they focus on one clear transformation or emotional moment.
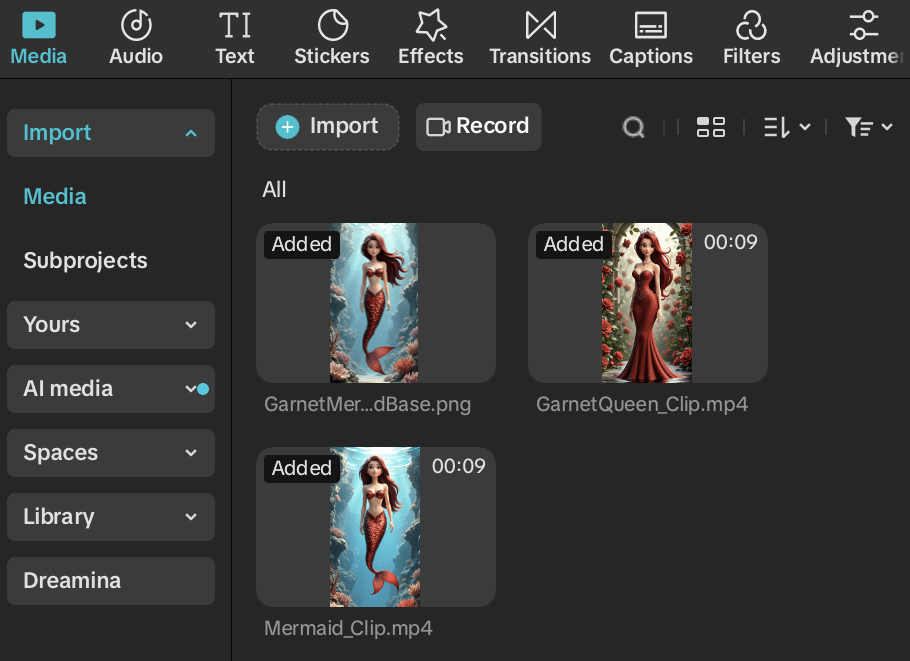
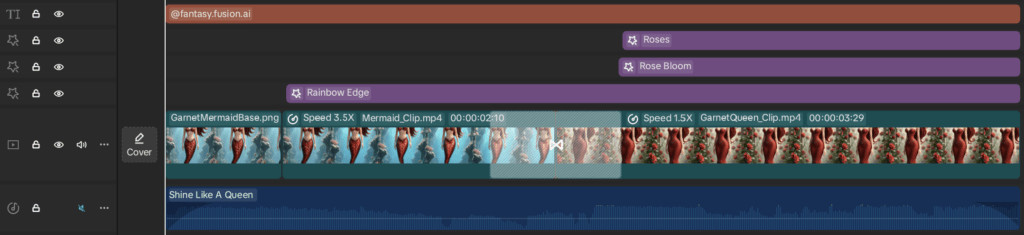
Step 1: Import AI Animation Clips into CapCut
The first step in learning how to edit AI animation clips in CapCut is importing your generated clips so they can be arranged and refined on the timeline.
Most AI animation tools produce clips that last 4–7 seconds, which makes them perfect for short-form storytelling.
Once the clips are loaded into the timeline, they can be rearranged, trimmed, and synchronized with transitions or music.
When editing AI animation clips, it helps to think about how the clips visually connect rather than treating each clip as a completely separate scene. The goal is to make the clips feel like part of one continuous moment.
Step 2: Use the Base Image to Create a Smooth Start
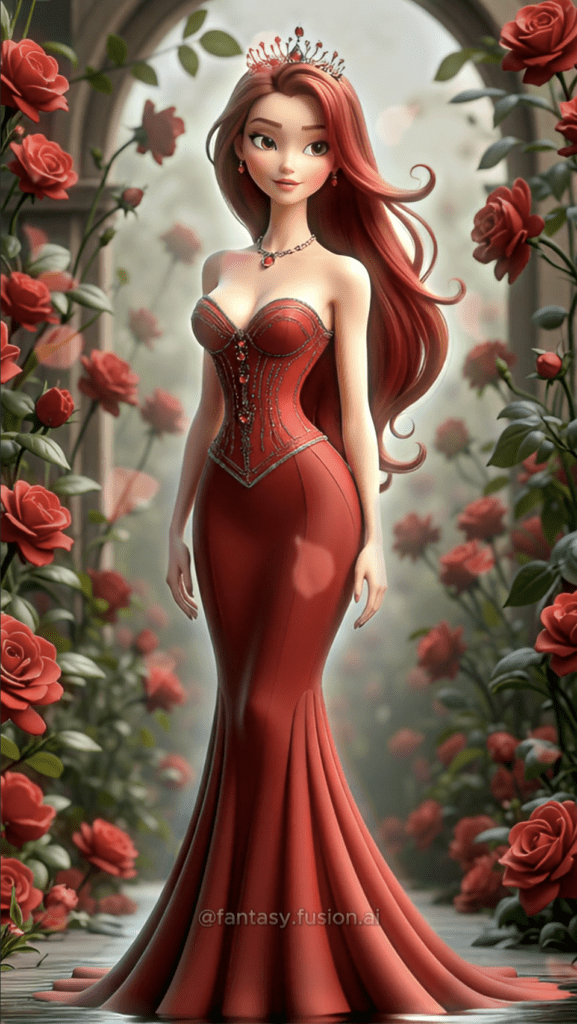
A simple editing technique that can significantly improve AI animations is placing the original generated image at the beginning of the timeline.
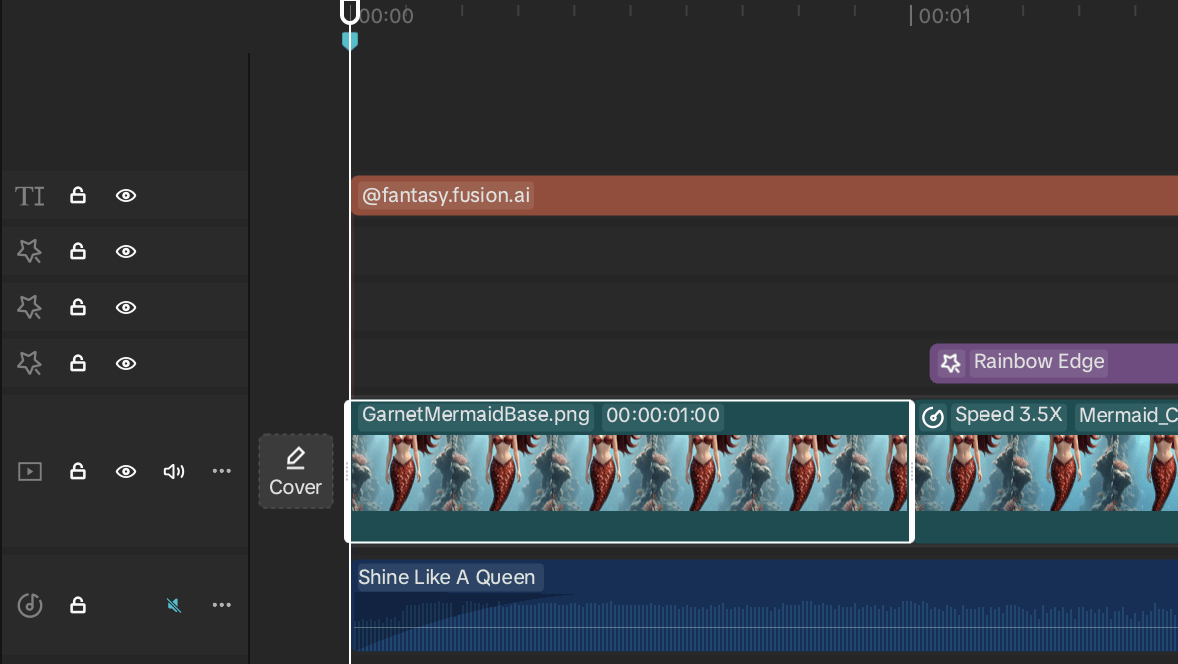
Showing the base image briefly before the animation begins gives viewers a moment to clearly see the character before the scene starts moving. Because the animation is generated from that same image, the first frame typically matches the still image exactly. This creates a smooth transition into motion, allowing the character to begin moving naturally without any visual jump or shift.
It also provides a small amount of flexibility when aligning the animation with music. Because the still image is visually identical to the first frame of the animation, it can be extended for a second or two without breaking continuity. This allows creators to fine-tune timing so the animation begins exactly where the music or transition feels most natural. Strong base images also help maintain visual consistency, ensuring the character design remains stable as the animation progresses.
If you’re looking to improve your generated images before animating them, you may want to explore our guide on crafting powerful AI image prompts.
Step 3: Structure the Timeline to Tell a Story
After the still image introduces the mermaid, the animation clips take over. A key part of editing AI animation clips is arranging these short segments so they build naturally toward the final transformation.
In this example, the clips were organized so the mermaid remains in her original form slightly longer before the transformation occurs. The early clips focus on her swimming upward, giving the scene time to develop before the petals appear and the final transformation happens. Even though the animation lasts only a few seconds, careful pacing and music help the moment feel intentional and cinematic.
Short-form animations work best when they focus on a single transformation or emotional moment. In this case, the scene centers on a garnet-themed transformation, with the rose elements supporting the gemstone and royal aesthetic.
Step 4: Add Transitions Between Clips
Transitions help smooth the visual shift between animation clips.
For this project, a Petal Wind transition (white box attached to both videos) was used between clips. This transition matches the rose theme used in the animation and visually reinforces the magical tone of the transformation.
Transitions should generally remain subtle. Their purpose is to guide the viewer’s eye from one moment to the next without distracting from the story. Used carefully, transitions are one of the simplest ways to enhance AI animations.
Step 5: Add Effects to Enhance the Scene
Visual effects can help unify multiple clips so they feel like part of the same magical environment.
Two effects were used in this animation:
(A) Roses Video Effect
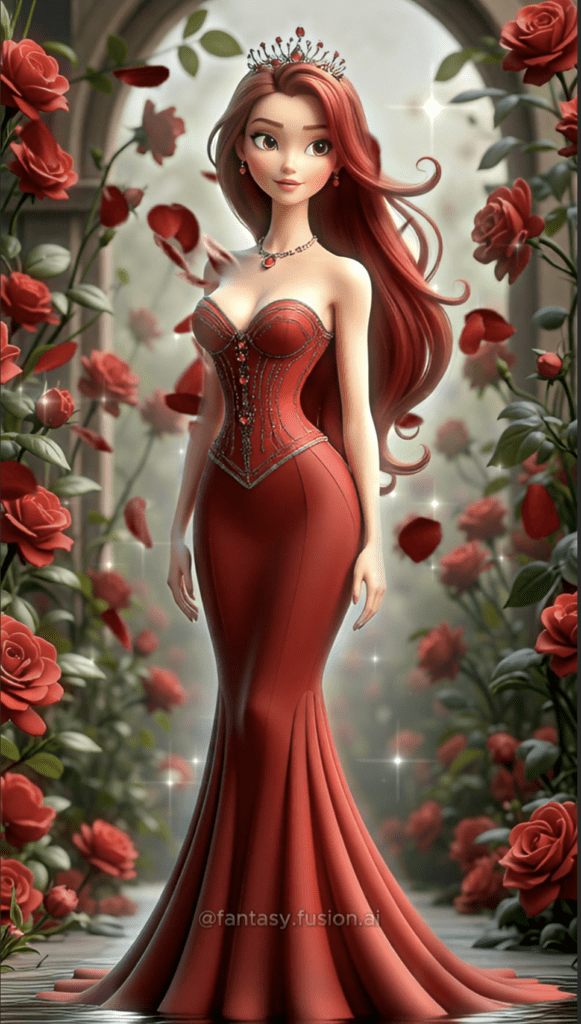
The Roses Video Effect is applied only to the queen form, creating subtle rose movement that enhances the Rose Bloom transformation and reinforces the final reveal.
(B) Rose Bloom Video Effect
The Rose Bloom Video Effect intensifies the transformation moment. As the character transitions into a queen, the environment becomes brighter and more dramatic.
(A)
Clip with Both Effects
(B)
Small effects like these can dramatically improve the storytelling impact of short animations.
Step 6: Add Character Effects for a Magical Look
A Rainbow Edge Body Effect was applied to the character.
This effect creates a glowing outline around the mermaid and queen, helping her stand out from the background while reinforcing the magical fantasy theme.
When editing AI animation clips, it’s usually best to use effects sparingly. Small visual enhancements often feel more cinematic than heavy visual processing. Some effects can even introduce unwanted artifacts. For example, the Luminance Body Effect can occasionally cause subtle flickering between frames, which disrupts the smoothness of the animation.
Step 7: Sync the Animation with Music
Music can dramatically improve storytelling, even in very short videos. When learning how to edit AI animation clips, syncing visual moments with music is one of the easiest ways to make a scene feel cinematic.
Lyrics referenced from the song “Shine Like A Queen” by Aera Lya. All rights belong to the original artist.
The sequence aligns with the song’s progression.
“Fire inside, it’s royalty…”
During this moment, the character is still a mermaid swimming upward.
As petals begin to appear, the music continues building.
Then the lyric hits:
“Shine like a queen, like the stars on a velvet screen.”
This is the moment where the mermaid completes her transformation and emerges as a queen.
The timing of each clip was adjusted to follow the build of the soundtrack, allowing the transformation to occur right as the music reaches its peak.
CapCut Pro vs the Free Version
I finished assembling the sequence in CapCut Pro so I could use the rose-themed effects and the music track that matched the mermaid’s transformation. CapCut Pro unlocks additional effects, transitions, and editing tools that make it easier when learning how to edit AI animation clips and experiment with visual storytelling.
Another advantage of CapCut Pro is access to CapCut’s built-in music library, which includes a large selection of tracks that can be used directly inside your videos.
The song used in this example, “Shine Like A Queen” by Aera Lya, was selected directly from the CapCut music library and synchronized with the animation to match key story moments. Because the music is provided inside CapCut, it can be easily aligned with transitions, effects, and visual beats during editing. Music available through CapCut Pro is generally licensed for use within the platform, which means creators can typically use these tracks in projects uploaded to platforms like YouTube. In some cases, automated systems may still flag the audio, but these claims can usually be reviewed or disputed since the track is part of the licensed CapCut Pro library.
That said, you can still experiment with the free version of CapCut. Many of the core editing tools are available without a subscription, making it a great place for beginners to start learning how to edit AI animation clips.
Try the Tools I Use and Love
If you want to create the same style of cinematic scenes shown in this post, here’s my link to the exact tool I use:
👉 VideoExpress AI:
https://www.fantasyfusionai.com/go/videoexpress
👉 Capcut:
https://www.fantasyfusionai.com/go/capcut
Once you understand how to edit AI animation clips, even a few seconds of AI generated motion can become a complete cinematic moment.
Affiliate Link Disclosure:
This article includes affiliate links. When you make a purchase using one of those links, I may earn a small commission. There’s no extra cost to you, and I only recommend software I actively use and trust.
Full disclosure page:
https://www.fantasyfusionai.com/affiliate-link-disclosure/
More AI Image and Animation Tutorials
If you want to go deeper into AI image creation and animation, these guides expand on the techniques used in this article:
How to Craft Picture Prompts That Create Powerful AI Images
Learn how to turn static images into cinematic animated scenes using modern AI animation tools.
How to Animate AI Images: Step-by-Step Beginner Guide
Learn how to turn static images into cinematic animated scenes using modern AI animation tools.
How Generative AI Works: The Powerful Shift in AI Image Creation
Understand how AI models interpret prompts and transform text into visual images.
Best AI Writing Software for Creative Writing & Fiction (2026 Guide)
Explore how AI writing tools can help spark character ideas and expand your fantasy stories.
These guides walk through the creative side of building worlds, crafting prompts, and transforming AI images into cinematic visual stories.
Frequently Asked Questions: Editing AI Animation Clips
Q: How do you edit AI animation clips in CapCut?
A: Creating a strong animation often depends on how the clips are arranged and timed. Placing each segment carefully on the timeline allows you to shape the pacing of the scene while using the music as a guide for the most impactful moments. In some cases, trimming a clip or briefly holding the opening frame can improve the flow of the sequence. Thoughtful use of transitions and visual effects can further enhance the atmosphere, and when everything aligns with the soundtrack, even a very short animation can deliver a memorable and emotionally engaging moment.
Q: How can I enhance AI animations?
A: You can enhance AI animations by improving pacing, adding subtle transitions, applying visual effects, and aligning the animation with music.
Q: Why are AI animation clips usually short?
A: Many AI animation tools output clips that last only a few seconds, which means the final scene often comes together by linking several short segments during editing.
Q: Do AI animations work well for short-form video?
A: Yes. AI animations are ideal for short-form platforms because they can quickly communicate visual stories in just a few seconds.
Q: What video editor should beginners use?
A: CapCut is one of the most beginner-friendly video editors available because its simple timeline interface and built-in effects make editing accessible for new creators.
See the project in action on:
Ready to level up your picture prompts and writing with a little AI magic? Visit our homepage to explore tools, tips, and inspiration designed to help storytellers like you bring their worlds to life.
Leave a Reply